Metacat Configuration
|
Metacat Configuration
|
||||||
| KNB Home | Data | People | Informatics | Biocomplexity | Education | Software | |
As of version 1.9.0, Metacat configuration is done internally by the application. When Metacat (Tomcat) is started, it will check to see if it is configured. If not, you will be automatically sent to the configuration pages.
If the installation is new, or the previous version is before 1.9.0, you will need to pay close attention to the configuration values. If you have upgraded Metacat, and the previous version is 1.9.0 or later, Metacat will pull existing values from a backup location. You should still verify that the values are correct.
Get to Metacat on your server by entering into the browser:
Where <your_context_url> is the url where Metacat will be served followed by the name of the war file(application context) that you installed. For instance, the KNB production Metacat url is:
You can always go to the configuration screen from within Metacat by typing:
The system will follow these rules in order to determine the order that the configuration will occur:
See the following sections for descriptions of how each of these work. For more information on each field, click on the blue question mark icon to the right.
Metacat uses LDAP as it's primary authentication mechanism, but you can define
your own mechanism by creating a java class that implements
AuthInterface. The configuration values needed are Authentication Class, Authentication URL,
Authentication Secure URL and Metacat Administrators. You need
to verify that the the Authentication URL and Authentication Secure URL are correct (fig 1).
You need to make sure that your user
account is entered into the Metacat Administrators field. You will not be allowed
to continue with configuration if this is missing.
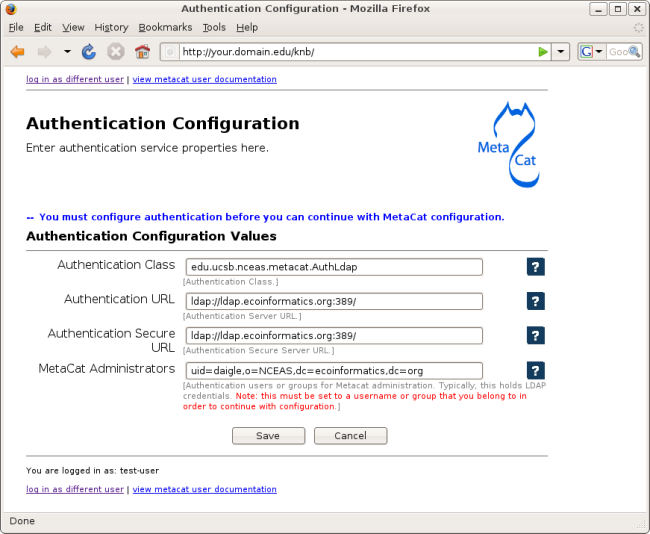
You will automatically be sent to the Authentication Configuration page if this is a new installation or upgrade.
You can also get to the Administrative configuration from a running Metacat by typing:
You will be required to log in as an administrator and restart Metacat once you make changes.
There is one exception to the log in rule. That is when you need to change or add authentication information, but you can't authenticate using the existing setup. For example:
In this case, you will need to edit the Metacat configuration file by hand and make the changes. This insures that only a person who has access to the Metacat server and the configuration files on that server will be able to change the administrator accounts
Stop Tomcat and edit the Metacat properties file at:
where <webapp_dir> is the place that Tomcat looks for applications and <context_dir> is the name of the Metacat application (usually knb). Change the following properties appropriately:
Save the metacat.properties file and start Tomcat.
Once authentication has been configured, you will be required to login as an administrative user if you haven't already. You will be taken to the administrator login screen (fig 2). You can also get to the login screen by choosing the "log in as different user" link at the bottom of any configuration screen.

You need to log in with an account that was configured as an administrative user in the authentication configuration section. If you did not set up the correct user there, you will need to go through the Changing Authentication Configuration Without Authentication instructions to set up the user.
Enter your user name. This is one of the Metacat administrators that you entered in authenticationuthentication configuration. Enter your password and hit the "Login" button. You should successfully log in.
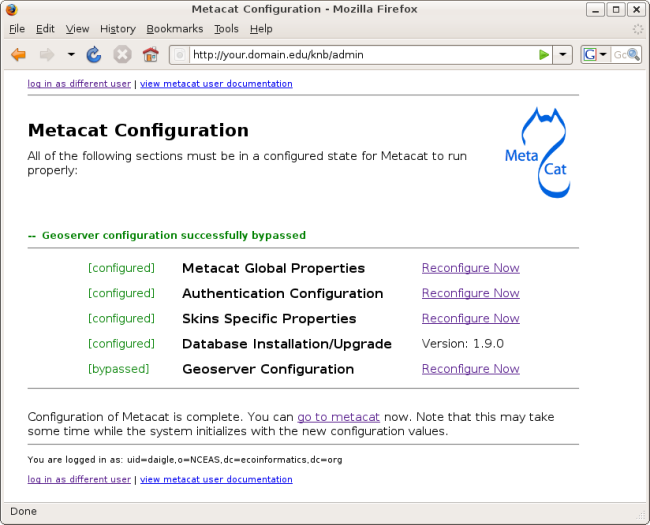
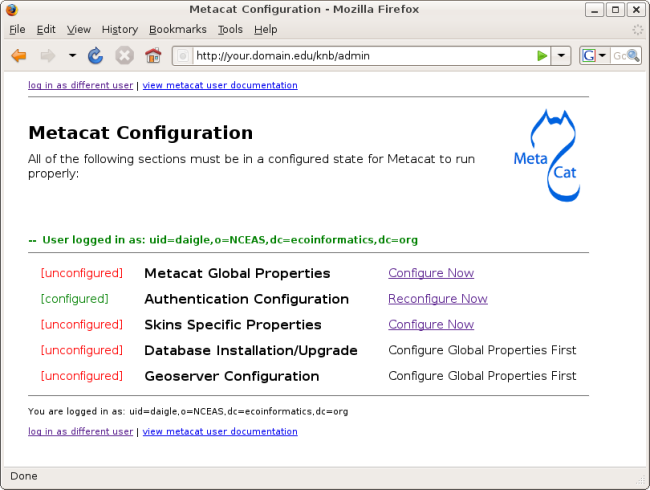
The main configuration screen acts as a gateway into individual configuration sections (fig 3). You should see that the authentication is already configured.
Each section is listed with a status to the left which can be one of:
To the right of each section is an option which can be one of:
All sections must be in a configured or bypassed state in order to run Metacat.
Metacat global properties are the bulk of the core properties needed to run Metacat (fig 4). For detailed instructions on setting these properties, refer to the blue question mark icon to the right of each property. Be sure that each of these are set appropriately.
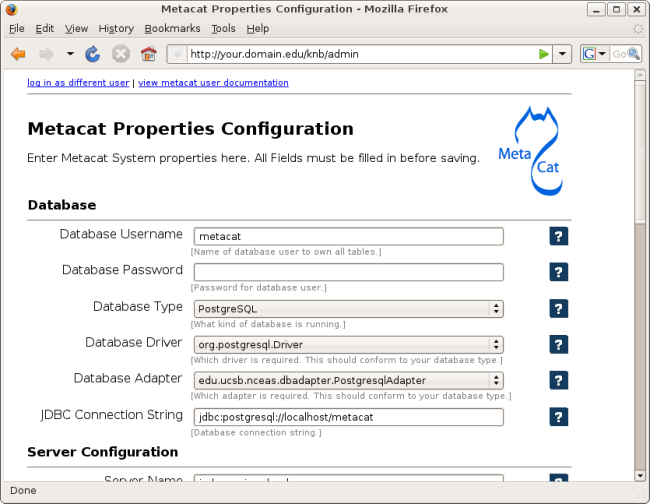
The first time you install Metacat, the system will attempt to auto-detect some values. These are:
You should be extra careful that these were detected correctly.
When you save global properties, they are saved in a backup file that is located in the following directory on linux:
When you update Metacat, the system will look for these backed up properties so you won't have to re-enter all the information from previous installs.
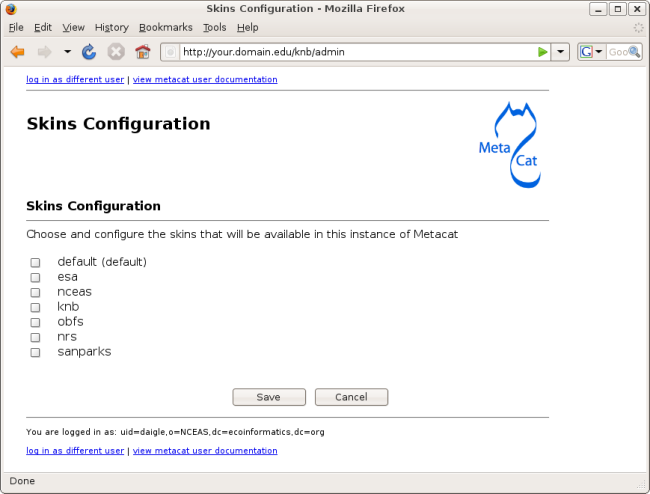
Metacat allows for a customized look and feel for the Metacat front end and for the online data registry services. There are two major functions provided by the skins configuration. The first is to choose which skin will be the default. The second will be to configure the look and feel of the online data registry pages. For more information on the online data registry option, refer to the Metacat Registry Installation documentation.
Note that if you are not using the online registry, and you don't have a custom skin, you can just save the default skins configuration and move on to the next configuration section.
There are several skins available to choose from in Metacat (fig 5). If you have a skin that has been developed specifically for your instance of Metacat, you should select the checkbox next to that skin. When you do, the form will open up with several options for that skin (fig 6). choose the 'Make "skin_name" default" radio selection. You should see "(default)" appear next to that skin name. Save the configuration and that skin will be the one that appears when users visit your Metacat site. Note that if you do not have a custom skin, you should leave your skin as the "default" skin.
The online registry code provides a web interface for entering data into Metacat. The screens are somewhat configurable as far as which fields show up and which are required. You should select each for which you want to activate the registry and then select the appropriate fields for that skin.

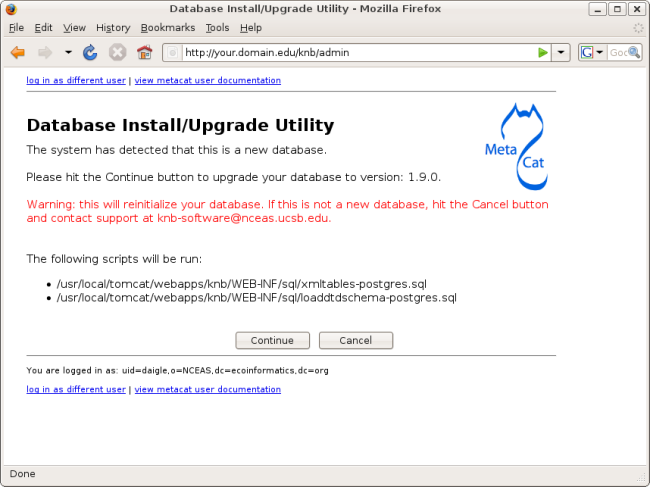
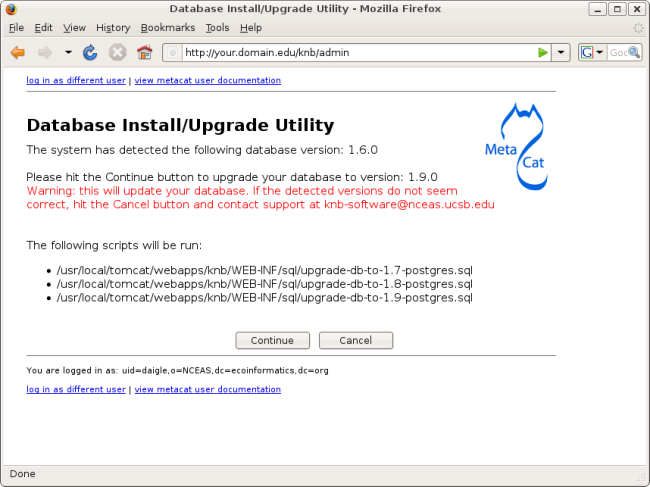
Metacat will detect the schema version of your database, and upgrade it if necessary. Once the global Metacat properties have been configured, the Database Installation/Upgrade link will become active on the main Metacat configuration page (see fig 3).
If this is a installation of Metacat, the database install/upgrade utility will inform you of this (fig 7). It will list the sql scripts that will get run in order to create a database schema for the version of Metacat that you are installing. If there is any question as to whether the database is new, you should choose to cancel. When you choose to continue, the server will run the scripts you saw earlier.
If this is an upgrade of Metacat, the database install/upgrade utility will inform you of the current version of the database (fig 7). It will list the sql scripts that will get run in order to update the database schema to the upgraded version of Metacat. If there is any question as to whether the detected database schema version is correct, you should choose to cancel. When you choose to continue, the server will run the scripts you saw earlier.
Metacat comes bundled with a Web Mapping Service called Geoserver which converts spatial data into web-deliverable map images. For more information, see the Metacat Spatial Option documentation. Geoserver installs with a default admin username and password. You should change these so that only local administrators can make changes to Geoserver.
When you choose the Geoserver Configuration link on the main configuratio page, you will go to a page that will prompt you for a user name and password (fig 9). When you enter a user name and password, the metacat server will contact the embedded Geoserver server and change the login credentails.
You also have the option of choosing "bypass". This will leave Geoserver configured with the default user name and password. The main configuration screen will show the bypassed status. The system will interpret the bypassed status the same as the configured status.
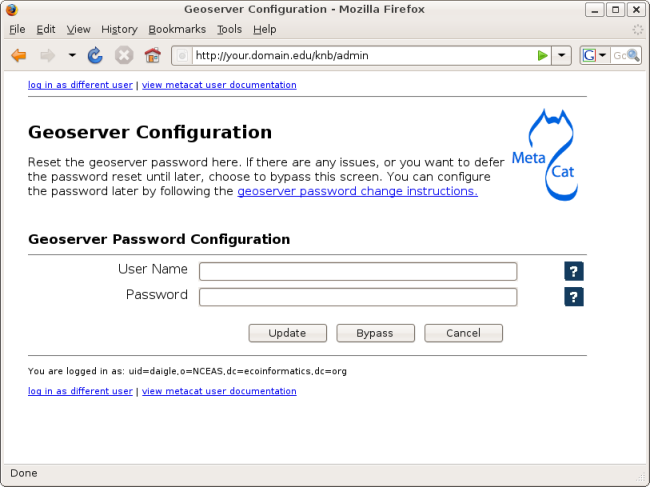
You also have the option of changeing the Geoserver username and password by logging in directly to the Geoserver. For more information on changing the credentials directly, refer to the Geoserver Password Change documentation. Note that once you change the credentails manually, you will not be able to use the Metacat admin tool to change it again (until a new Metacat Upgrade or installation).
If you are reconfiguring an already running version of Metacat, you will not have the option to go directly back to Metacat. You will need to restart the server (Tomcat).